To help organize all of your email, you can create a rule to automatically move email to a folder from specific people or email addresses. This will help you bring visibility to them or get them out of the way. Here are the steps to create a mailbox rule using the Outlook Web App (best method as they will work regardless of what you use to access your email).
- Login to https://login.microsoftonline.com with your Microsoft 365 account.
- Click on Outlook on the left side of the page.
-
At the top right of the page select Settings
 .
.
-
Select Mail, which opens the Options panel on the left. Under Mail > Automatic processing, select Inbox and sweep rules.
-
Select Add
 under Inbox rules.
-
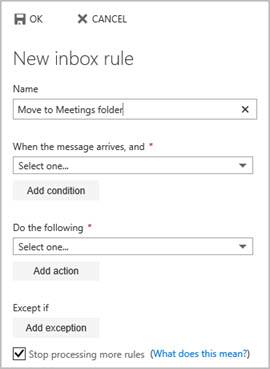
Type a name for the inbox rule in the Name box and then select a condition and action from their respective drop-down lists.

You can add additional conditions or actions by selecting Add condition or Add action.
-
Add exceptions to the inbox rule by selecting Add exception and then choosing one from the Add exception menu.
-
By default, the Stop processing more rules option is turned on. With this option on, when a message arrives in your inbox that meets the criteria for more than one rule, only the first rule will be applied. If you don't select this check box, all inbox rules that a message meets the criteria for will be applied.

If you have any questions or problems setting this up, please email Tech Help or stop by the Tech Office.